4 Simple Steps to Teach Photography

Date

Photography is one of the most exciting units I teach in my journalism class. It’s so fun to see students move beyond the point and shoot they are used to and see them practice technical skills and photography composition techniques. 

We are a visual society. Every day, 95 million photos are published on Instagram! Over 50 billion have been posted since Instagram started. We love photos. We love telling visual stories. Yes, there is a difference between taking a casual snapshot or selfie and honing the craft of professional-looking photography. 

Tip 1: Photography as storytelling

For some students, their only photography experience is BeReal and Instagram, however photography involves so much more. It can be used to capture elements of the human experience, tell stories, and chronicle history. 

I start by having my students visit professional websites like The Washington Post and National Geographic to see strong examples of storytelling through photography. Students investigate their emotional reactions to the photos, as well as analyze the craft of photography by looking at the techniques that govern the quality of the images (framing, light, composition, and more!). Through these exercises, students quickly figure out photography involves a balance of artistic vision and technical merits.


Fun lab activity

 It’s important to get cameras in the hands of students early in this unit so they can practice and experiment with a variety of techniques. The first activity I have students complete is “Selfie Storytelling”.  This is a fun way to have students practice taking photographs, while considering how they are taking photographs. Also, you can also use this activity as an ice-breaker for students to get to know each other. Sneaky teachers!

Tip 2: Camera Basics

Most students carry their phones with them everywhere, so all they have to do is point and shoot. And boy do they ever! Learning how to use a manual camera involves learning about using a tripod, flashes, lenses, and settings. I start by guiding students through the technical aspects of how to adjust settings on their cameras: ISO, Aperture, and Shutter Speed. 

Overview of skills learned in this section: 

  • Shutter speed: Controls the amount of time the shutter is open (how fast the shutter will “blink”).
  • Aperture: The size of the hole that lets light into the camera 
  • ISO: The amount of light that strikes the film/chip is measured in stops and is also known as exposure value (ev)

Shutter speed tips: 

  • To create sharp action photographs (i.e. sports photographs), use the a high shutter speed, (i.e. 1/125th of a second or more). 
  • Less light gets through to the imager as shutter speed is increased, so it is difficult to use higher shutter speeds in lower light situations. 
  • Alternatives: Allow more light to pass through the lens (larger aperture setting), or increase the ISO.
 

Aperture Tips

  • A larger lens opening (f1.8-3.5): 
  • Allows you to shoot more often with just natural lighting and helps reduce harsh shadows and red-eye caused by flash. 
  • Allows more light to pass through and the camera will be able to choose a slightly higher shutter speed which helps to reduce motion blur.
  • Helps to reduce “depth-of-field“ (for effect).
 

ISO Tips

  • ISO settings are often rated at 100, 200, 400, 800, 1600, and even 3200 on some models 
  • Use an ISO of 100 or 200 when taking photographs outside in sunny conditions. 
  • If the sky is overcast or it is evening time, or in a darkened room, then use an ISO within the range of 400 to 800. 
  • For dark shots (night) or in cases of low light, set a digital camera ISO to 1600. If not, the photo will appear too dark.
To purchase this photography & photojournalism unit click here!

Fun lab activity

I created 3 technical challenges for students to practice: ISO, Shutter Speed, and Aperture. Students will use the definitions, strategies and tips provided through this section, students will practice and experiment by taking photos to show they understand how to manually adjust settings on their camera.

Don’t miss this: Included in this unit is a camera bag resource guide. Students can easily cut this handy guide that includes tips and guidelines for manually setting their cameras and keep it stowed safely in their camera bags at all times!

Tip 3: Photography Composition

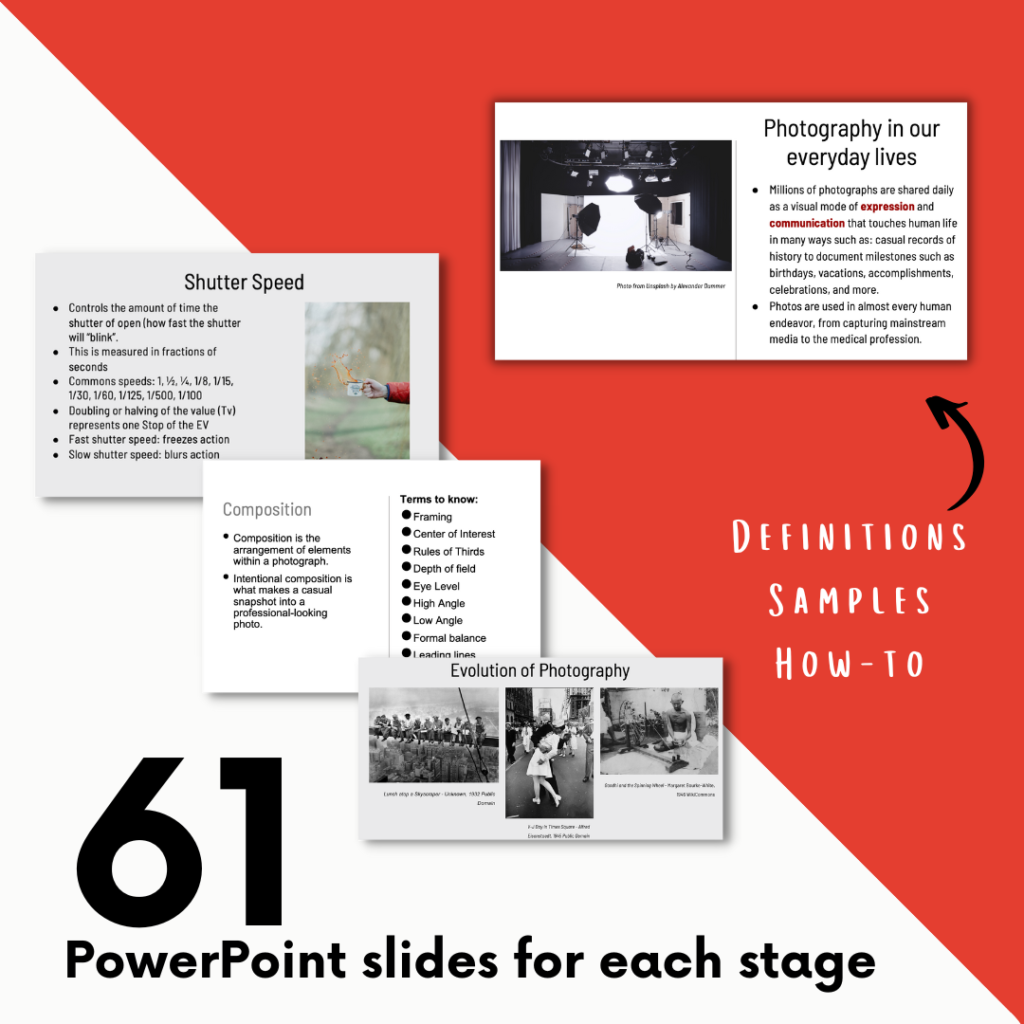
Once students have a solid foundation of how to use their cameras, it’s time to teach them about the artistic side of taking photographs through composition techniques. Composition is how the photographer arranges elements within a photograph to create a professional-looking photo.

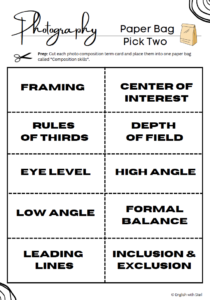
During this section, students learn about the following composition techniques:

Framing: Using the foreground to “frame” the subject of the photo.

Center of interest: Each photo should have a center of interest that directs where viewer’s eyes go first. 

Rule of thirds: Instead of placing the subject at the center of the shot, the photographer intentional moves the focal point of the subject into one of the “third” sections of the frame. 

Depth of field: There is only one distance at which a subject is precisely in focus, but focus falls off gradually on either side of that distance, and there is a region in which the blurring is imperceptible under normal viewing conditions. 

Eye level: The camera is at eye-level of the subjected being filmed, as if to replicate a real-life conversation (approximately 5-6 feet from the ground).

High level: The camera is positioned so it is looking down upon the person being filmed.

Low level: Low angle shots help distort or increase height (helpful for shorter actors). 

Formal balance: Balancing elements within the photograph by either arranging subjects, colors, or natural design.

Leading lines: Use lines and curves within a photo to direct our eyes to places within the photo.

Inclusion & exclusion: Inclusion: Including all elements of the photograph, including surrounding elements. Often a medium or establishing shot. 

Exclusion: Determining what elements distract from the main purpose of the photo.

Fun lab activity: I use 4 different practice activities for this section, but the one students absolutely love is this paper bag challenge. Students draw one card out of one paper bag that includes a descriptor like “happy” or “excited”. Students also select a card from a second paper bag that includes a photo composition technique like “framing” or “high level”. Students then have to take a photo using both words! It’s hilarious to see what students come up with as they take photographs.

Tip 4: Photography captions

In publications, writing a powerful caption or cutline is critically important to help tell the story of the photograph. 

A photo caption is like a little story that goes below the photo to explain what is going on in the photo. 

A good photo caption will:

  • Clarify what reader’s see in the photo.
  • Provide additional details and information so readers learn the 5Ws and how about what is going on in the photo.
  • Be active, complete, and interesting for readers.
  • A strong photo caption should be about 2-3 sentences, include the 5Ws and how of what’s being photographed, and should explain the action of tho photo. 


For more tips and strategies, check out my photo caption mini-unit that works for all publications!

To purchase this photo caption mini unit click here!


Check out some of my favorite photographers who demonstrate strong composition techniques: 

Alyssa Schukar  

Andrew Dickinson

Aaron Lavinsky

More
articles

© 2023 Created with Royal Elementor Addons